一、概述:
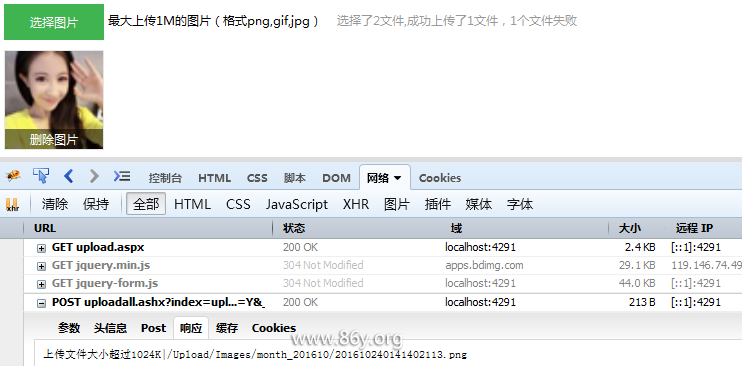
在html5以前,大家对批量上传还只能用SWF或,模拟来实现数据批量上传的效果,使用起来非常不方便,代码也是非常的多。随着html5越来越普及,已经可以直接使用file文件上传控件直接批量上传了。关键属性 multiple,本实例的实现是模拟了input file效果,功能是一样的。上传图片后台结合了net 中的ashx接口实现了批量上传并添加水印的效果。(底部附源代码下载)效果如下图所示:

二、实现过程:
1、准备工作:引入Jq库(http://apps.bdimg.com/libs/jquery/2.1.1/jquery.min.js),及jquery-form.js插件(jquery-form.js下载地址)
2、html代码如下:
<form id="aspnetForm" runat="server">
    <div class="uploadimg mt40 ml25">
        <div>
            <a href="javascript:;" class="bg40b450 cfff btn"><i id="haspic">选择图片</i><input type="file" id="uploadfile" name="uploadfile" multiple="multiple" class="pac0" /></a>
            <label>最大上传1M的图片(格式png,gif,jpg)</label><span id="filelength"></span>
        </div>
        <div id="pic" class="clearfix"></div>
    </div>
</form>
说明:这个最重新的部分是id="aspnetForm" runat="server",缺一不可。其它的可以根据自己的功能自定义.
3、JS核心代码,代码已注释,不作说明
function bindclick() {
    //删除图片事件
    $("#pic a.del").unbind();
    $("#pic a.del").click(function () {
        $(this).parent().remove();
    });
}

// 每次上传总数
var uploadcount = 0;
$(function () {
    //图片上传
    $("#uploadfile").change(function () {
        if($(this).val()!="")
        upload($(this).attr("name"),1024,"Y");
    });

});

//图片上传方法
//obj1传上传控件的name属性,maxlength上传图片大小kb单位,watermark上传的图片是否加水印
function upload(obj1,maxlength,watermark,w,h) {
	//此id与form的id一致,并且必须加runat="server"否则上传不了
    $("#aspnetForm").ajaxSubmit({
        url: 'uploadall.ashx?index=' + obj1 + '&maxlength=' + maxlength + '&watermark=' + watermark + '&_=' + Math.random(),
        beforeSubmit: function () {
        },
        success: function (data) {
        var imglist = data.split("|");
        var imghtml = "";
        var cren = "";
        var hascrent = $("#pic p.crently").length > 0 ? 1 : 0;

        for (var i = 0; i < imglist.length; i++) {
            if (imglist[i].indexOf("Upload/Images") != -1)
                imghtml += '<p ' + cren + '><b>默认图</b><a href="javascript:;" class="del">删除图片</a><img src="' + imglist[i] + '"></p>'
        }

        //上传总数统计
        if($("#pic p").length==0)
            uploadcount = $("#pic p").length + $("#uploadfile")[0].files.length;
        else
            uploadcount += $("#uploadfile")[0].files.length;

        $("#pic").append(imghtml);

        //上传成功个数
        crentcount = $("#pic p").length;

        //上传失败个数
        var failcount = uploadcount != + crentcount ? ","+ parseInt(uploadcount - crentcount) + "个文件上传失败" : "";
        $("#filelength").html("选择了" + uploadcount + "文件,成功上传了" + crentcount + "文件" + failcount);
        bindclick();//绑定删除事件
        }
    });
}
4、ashx批量上传接口代码
using System;
using System.Web;
using System.IO;
using System.Web.SessionState;

public class uploadall : IHttpHandler, IRequiresSessionState
{

    ///
    /// 该上传方式应用于非跨域
    ///
    ///
    public void ProcessRequest(HttpContext context)
    {
        context.Response.ContentType = "text/plain";

        string res = "";
        string index = "";
        if (context.Request.QueryString["index"] != null)
        {
            index = context.Request.QueryString["index"].ToString();
            HttpFileCollection files = System.Web.HttpContext.Current.Request.Files;

            HttpPostedFile file = null;
            int count = context.Request.Files.AllKeys.Length;
            for (int i = 0; i < count; i++)
            {
                file = context.Request.Files[i];
                if (file != null)
                {

                    try
                    {
                        int width = 400;
                        int height = 400;
                        if (context.Request["width"] != null && context.Request["height"] != null)
                        {

                            int.TryParse(context.Request["width"].ToString(), out width);
                            int.TryParse(context.Request["height"].ToString(), out height);
                        }

                        int[] widths = new int[] { width, height };


                        int maxlength = 800;//默认图片上传大小
                        if (context.Request["maxlength"] != null)
                        {
                            int.TryParse(context.Request["maxlength"].ToString(), out maxlength);
                        }

                        //是否加水印变量
                        string watermark = "";
                        bool fale = false;

                        if (!string.IsNullOrEmpty(context.Request["watermark"]))
                        {
                            watermark = context.Request["watermark"].ToString();
                            if (watermark == "Y")
                            {
                                fale = true;
                            }
                            else
                            {
                                fale = false;
                            }
                        }
                        //上传图片类调用,file:单个文件,fale:是否添加水印,maxlength:图片上传大小
                        res += new UpFile().Upfile(file, fale, maxlength);
                        if (i != count - 1)
                            res += "|";
                    }
                    catch
                    {
                        res = "false";

                    }
                }
            }
        }
        context.Response.Write(res);
    }
    public bool IsReusable
    {
        get
        {
            return false;
        }
    }
}
源代码下载地址:http://pan.baidu.com/s/1dFrA8k5 密码: jkt5
三、结语:
本实例实现了图片批量上传的效果。如果有什么好的建议可以留言,希望能与大家一同进步!